Requirements
Make sure you have completed the following tasks before your proceed.
- Installed Photo Uploader into your org
- Installed a component to the Object you plan use (Custom or Standard)
- Have created a custom text Field within a custom or standard Object
- Reference our Post-Installation Instructions if you need assitance with 1 or 2
1. Modify The Existing Component
We seek to store the FILE ID from the image uploaded to Photo Uploader and store its value within a custom field, let’s get started.
1.1 Locate Photo Uploader Component
First, head over to the custom Object (in our example it’s called Maps). From here, click into one of the records and locate the Photo Uploader component.

1.2 Edit Page Layout
Proceed to edit the page layout by heading over to the “gear icon” and select “Edit Page” from the drop down.

1.3 Component Page Settings
Within the Lightning App Builder click into the Photo Uploader component to display its page settings.

1.4 Define Custom Field API Name
Here you will find the “Field API Name.” This is where to enter the “field name” that tells Photo Uploader where to store the FILE ID everytime an upload is complete.

1.5 Obtain Field Name
You need to obtain the “field name” within your org. If you already have this information feel free to skip step 2 and proceed to step 3.
2. Retreive Custom Field Name
Open up a second window and head back to our org to locate the “field name” of the custom field.
2.1 Identify the Custom Field Used
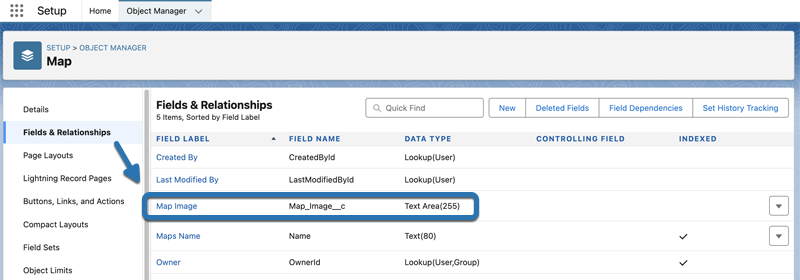
We have already created a “Map Image” custom field within our Map Object. Locate your custom field and proceed to obtain its “field name”.

2.2 Edit Object Page
There are various methods to obtain this information, will start by using the “gear icon” and choosing “Edit Object” from the drop down from within the record page.

2.3 Fields & Relationships
From Object Manager, click into “Fields & Relationships” and locate the custom field. On the “FIELD NAME” column you will find its name. In our case it will be “Map_Image__c”. Go ahead and copy this name.

3. Apply Changes To Component
With our “field label” name we can go ahead and continue where we left off from Step 1.
3.1 Paste Field API Name
Now back in on the Lightning App Builder we can paste the name into the Photo Uploader component settings page.

3.2 Save Component Settings
To save these changes click on “Save” and exit the App Builder page by clicking on the “back arrow” to the left of the page.

4. Verify Component
Now with our component changes applied we can test to make sure each time an image is added to Photo Uploader its FILE ID is stored within the custom text field.
4.1 Upload Image
Using the component either drop or upload an image directly.

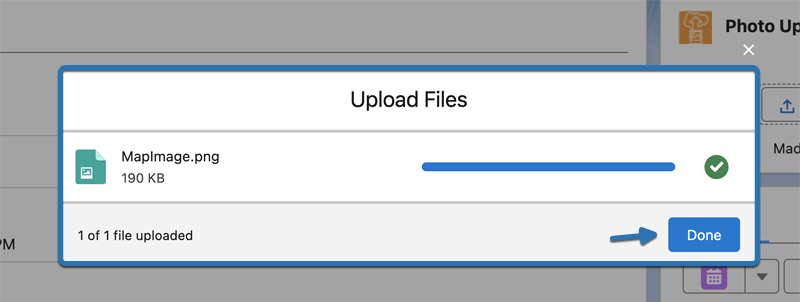
4.2 Complete Upload
Once the upload is complete, press “Done” to confirm.

4.3 Image Uploaded
The image stored within the Photo Uploader component should now have a resized snapshot you can click into.

4.4 File ID Stored Within Custom Field
Refresh the page to see the FILE ID of the image uploaded populated within the custom field. Every new upload to Photo Uploader will generate a new FILE ID, even if the image is the same.

Share Your Experience With Us
If Photo Uploader is helping your organization connect with your clients, customers or partners we hope you would be kind enough to share that experience with others. Head over to the AppExchange and leave us know your positive sentiment.
On the other hand if you have feedback or ideas you wish to pass on to the Dev or Support teams we’d love to hear from you. Email us at support@photouploader.app